Lead scoring automation: From enriched data to revenue-ready leads
Published:
August 19, 2025
, Updated:
October 16, 2025
You’ve enriched your leads – great. You know who they are, what they do, which tools they use, and even what content they’ve interacted with. But… nothing happens next.
Sound familiar?
Welcome to the execution bottleneck – where enriched data piles up, but workflows stall out.
Nothing moves. No scoring. No prioritization. No routing.
We see it all the time:
- Leads are enriched, but not scored.
- Scored, but not prioritized.
- Prioritized, but not routed – or worse, routed manually.
This is the gap between knowing who a lead is and actually doing something about it.
That’s where automated scoring, prioritization, and routing can turn enrichment into real lead generation momentum.
Let’s show you how to do it and streamline the entire process.
Step 1: Score leads using predictive lead scoring model and real-time signals
Turn flat enrichment into decision-ready leads with an automated, predictive lead scoring model.
We’ll use a simple logic layer powered by GPT + real-time intent signals to score leads based on context, never guesswork.
Why this lead scoring logic works?
Instead of relying on rigid, rules-based scoring (think: “If job title contains ‘VP’ → +10”), GPT evaluates the full lead context – title, company size, tech stack, engagement behavior.
Then it outputs a relevance score for your sales team to act on, ultimately shortening sales cycles and improving conversion rates.
Example:
- “Marketing Manager at a 500-person SaaS using HubSpot and showing spike in website visits or registering for webinar” → High
- “Founder at 2-person agency using Mailchimp, no recent activity” → Low
Prompt logic (in plain English):
“Based on company size, industry, job title, and tech stack, rank this lead’s likelihood to be a good fit for our [ICP]. Output: High, Medium, or Low.”
Add a modifier for urgency:
“If they’ve visited the site in the past 48h or opened 2+ emails, mark as Urgent.”
How does this lead scoring model plug into your system?
You don’t need a developer. This can run in:
- Airtable: store enriched lead data + scoring output
- Sheets: prompt GPT to score directly via GPT extension or Make
- Slack: push “High + Urgent” leads to sales reps in real-time
- HeyReach: auto-segment into outreach campaigns based on score to optimize targeting
With Origami + Factors, it’s even easier:
- Origami handles prompt execution + scoring logic in the background
- Factors pulls in enrichment + real-time activity (visits, opens, clicks)
Let’s further break down how this combo works.
Score with Origami Agents
Origami takes the heavy lifting out of the lead scoring process by letting you run no-code GPT prompts across your enriched data.
No custom scripts. No developer needed. Just set the logic once, and Origami scores every new lead automatically in the background.
Why lead scoring with Origami works:
You can create scoring rules that are as simple or as advanced as you want.
- For example, give each lead a score from 0–100 based on persona fit, engagement recency, and ICP match.
Origami looks at everything you feed it – job title, seniority, company size, industry, tech stack, behavioral data, past activity – and applies your scoring logic instantly to identify high quality leads and opportunities.
How to set up lead scoring in Origami:
- Pick your scoring inputs – e.g., title, seniority, company size, industry, demographic information, ICP keywords, recent engagement.
- Write your GPT prompt in plain English. Examples:
- "Score this lead from 0–100 based on how closely they match our ideal customer profile. Prioritize VP or C-level roles at SaaS companies with 200–1000 employees."
- "If the lead visited our pricing page in the last 7 days, add +20 points. If they opened 3+ emails in the last 14 days, add +10 points."
- "If their tech stack includes HubSpot or Salesforce, add +15 points. If their industry isn’t on our ICP list, subtract 30 points."
- Add fallback logic – e.g., "If any required field is missing, assign a default score of 50 or send to manual review."
💡 Pro tip: Origami plays nicely with Factors, Airtable, and HeyReach, so once a score is generated, “High” leads can be routed instantly to the right campaign, rep, or workflow without you lifting a finger.
Add intent triggers using Factors
Factors gives you real-time buyer intent signals – things like job changes, tech installs, new hires, social media engagement, and other activity that screams, “Something’s happening over here.”
These aren’t just nice-to-have data points. They’re urgency flags that tell you when to move now versus when to hold back.
Why lead scoring matters:
Scoring alone tells you which qualified leads to target. Intent signals tell you when.
When you combine Factors’ signals with Origami’s AI-powered scoring, you get a logic layer far more dynamic than traditional lead scoring tools or basic marketing automation setups.
It shows your team where to direct your sales efforts next based on real touchpoints and increases the likelihood of faster lead conversion.
And all of this leads to better prioritization and more accurate forecasting of pipeline health.
Example logic for lead scoring:
- High score + job change → Tag as Demo-ready. Trigger instant outreach.
- Medium score + tech install → Tag as Nurture. Keep them warm until the timing’s right.
- Low score + no signals → Tag as Deprioritize. Don’t waste time here.
How it works together:
- Origami scores leads based on fit.
- Factors monitors them in real time for urgency signals.
- The combined logic routes leads into the right bucket automatically – whether that’s your “hot lead” campaign, a nurture sequence, or the back burner.
When your scoring system understands both fit and timing, you finally stop chasing ghosts.
Create a lead decision matrix/tree
Once you’ve got fit from Origami’s GPT scoring and timing from Factors’ intent signals, you need a clear way to decide where each lead goes next. That’s why you’ll need a lead decision matrix.
Think of it as your if/then routing table – the brain of your system.
Without it, you’re just collecting scores and signals without a plan to act on them, leaving your sales process reactive.
Here’s a simple reference of lead decision matrix you can model:
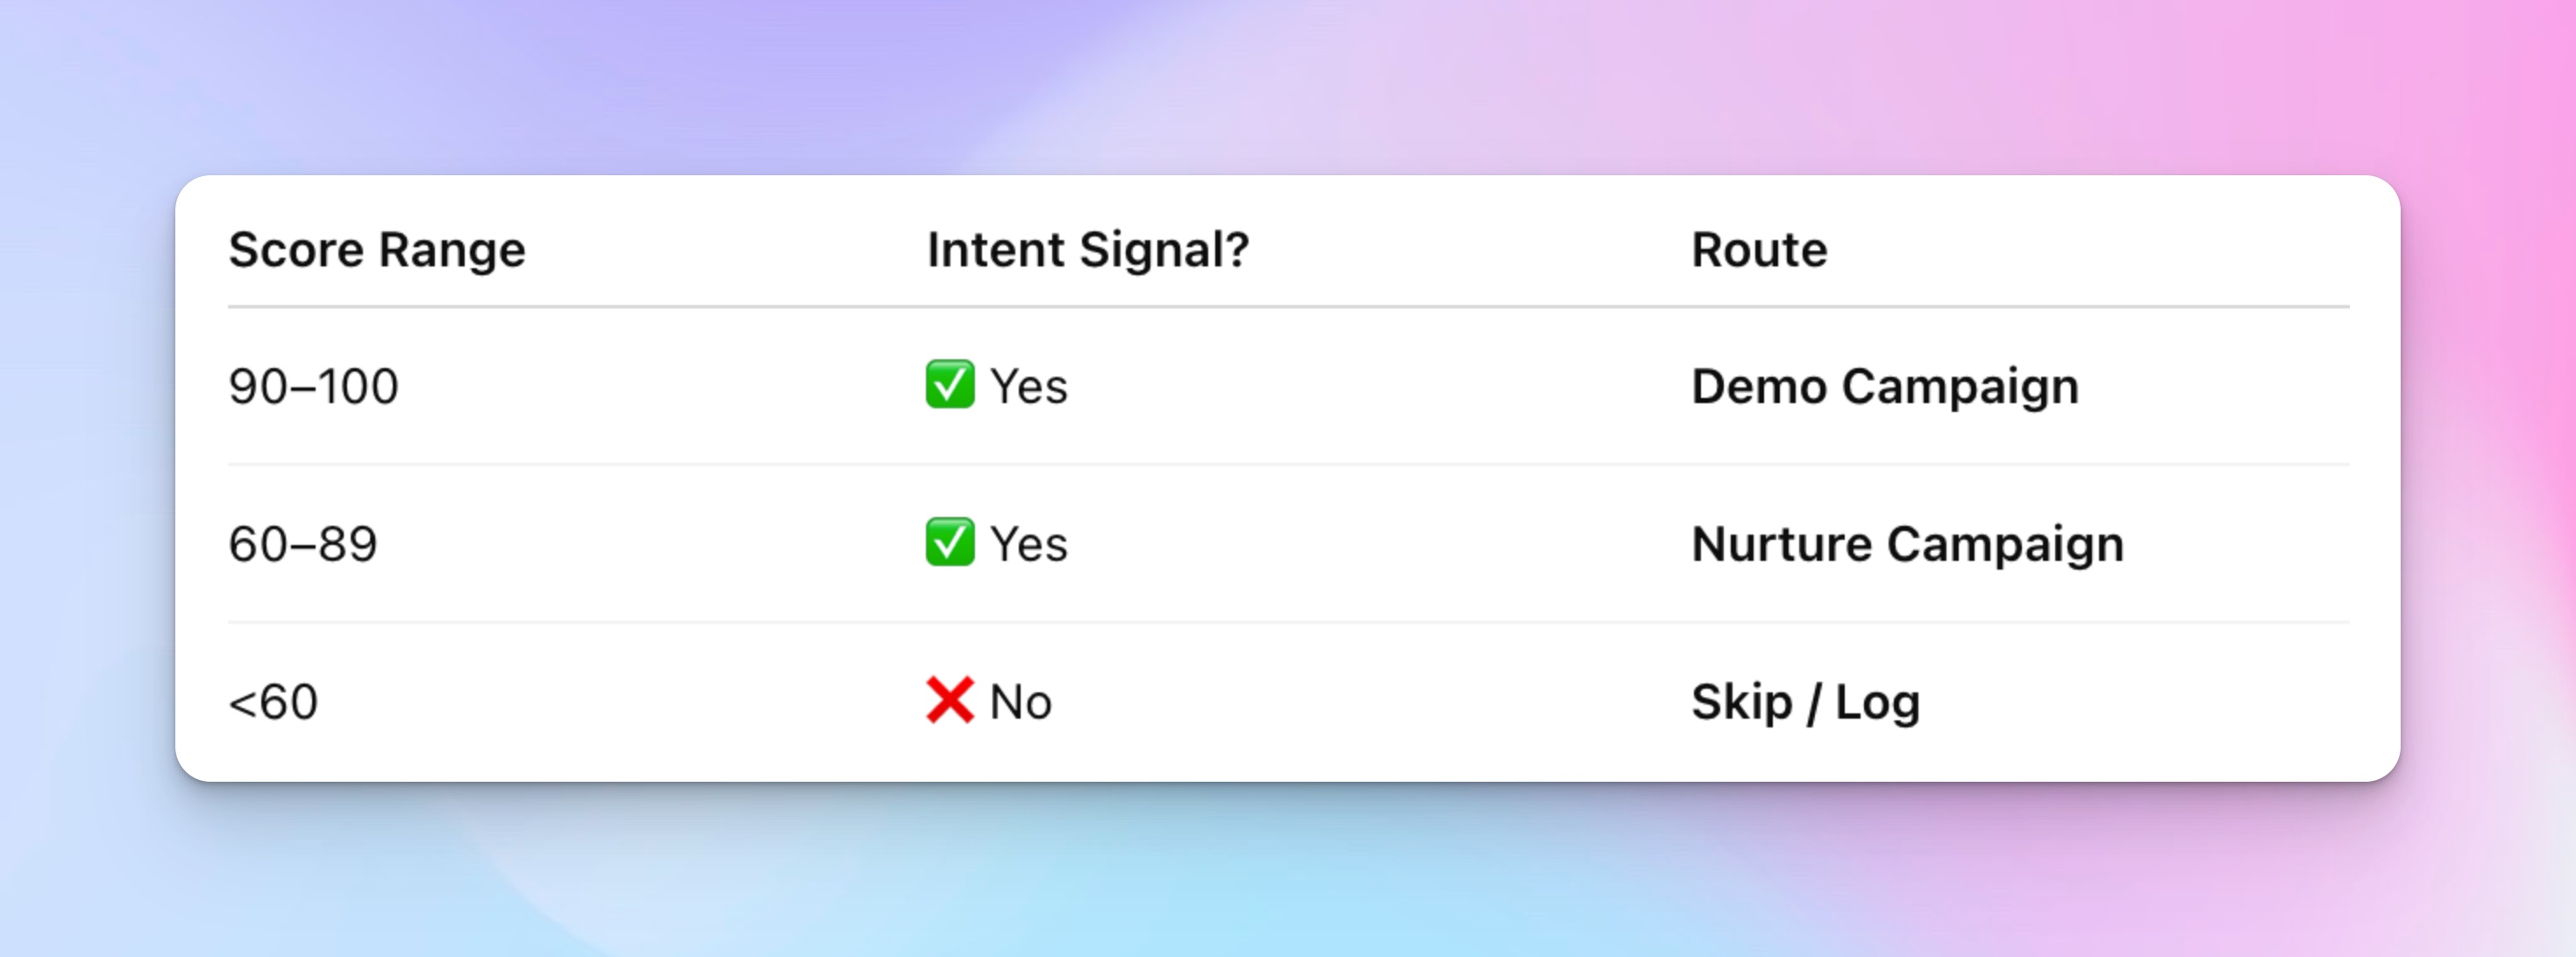
How lead decision matrix works:
- High score + signal = strike while the iron’s hot → send straight to your HeyReach demo-ready sequence.
- Medium score + signal = stay on their radar → move into your nurture campaign.
- Low score + no signal = don’t waste cycles → log them for later review or enrichment.
This process keeps your routing clean and aligned with the entire customer journey.
Step 2: Build a filterable lead queue in Sheets or Airtable
This is where scored and tagged leads turn into a clean, organized queue – so ops teams can quickly filter, sort, and kick off outreach.
Imagine it as an execution layer, the bridge between your scoring logic and campaign triggers.
Use Smart Views to segment leads
Smart Views make it simple to surface the right leads at the right time. By filtering on score and intent signals, you can instantly see who to route, who to nurture, and who to enrich.
There are three Smart Views you can set up:
🔴 High Priority
- Filters: Score ≥ 90 AND Signal present (job change, tech install, or new hire)
- Next step: Route immediately to your demo-ready HeyReach campaign to engage sales-ready leads without any delay.
🟡 Campaign-Ready
- Filters: Score 60–89 (signal optional)
- Next step: Add to your nurture sequence to keep them warm until they show stronger intent.
🟣 Needs Enrichment
- Filters: Score missing or <60 OR Missing firmographic fields (e.g., company size, industry)
- Next step: Hold for enrichment, add missing data, or send to manual review before routing.
Insert a downloadable Google Sheet or Airtable base
Map leads to campaign destinations
Before you flip the automation switch, you need a clear, pre-baked routing plan for every lead in your queue.
The easiest way? Add a “Campaign ID” column to your Sheet or Airtable base.
This column tells your automation tool exactly where each lead should go – no guessing, no manual sorting later.
Why it matters:
When routing logic is built into the queue itself, your team doesn’t have to stop and decide on campaigns one lead at a time. This keeps lead qualification consistent and prevents the bottlenecks that so often pop up between sales and marketing teams.
It also makes integrations with tools like Pabbly smoother, since you’re passing clean, pre-assigned campaign IDs straight into automation flow.
And it makes it easier to tie routing decisions to downstream metrics.
How to set it up:
- Add a Campaign ID column next to your score and signal columns.
- Use simple rules to assign campaign IDs automatically:
- Score ≥ 90 → DEMO_01 (Demo-ready campaign)
- Score 60–89 → NURTURE_01 (Nurture campaign)
- Score < 60 → SKIP or HOLD (No outreach)
- For leads missing a score or ICP match, tag them as ENRICH so they can be reviewed before going anywhere.
💡Pro tip: Lock these rules into your team’s workflow so everyone is using the same scoring criteria. Consistency here means less cleanup later and faster automation handoff.
With Campaign IDs assigned, your queue is now automation-ready – all that’s left is connecting it to Pabbly. And speaking of Pabbly, let’s dive more into it.
Step 3: Route leads into HeyReach via Pabbly
Once you’ve built a filterable lead queue with campaign tags, it’s time to put that logic into motion.
The goal here is simple: automatically send the right leads to the right HeyReach campaign without touching a single row manually.
Pabbly connects directly to Google Sheets or Airtable, integrates with HeyReach, and supports if/then routing rules.
Pabbly routing flow
Here’s a super simple lead management flow you can set up and replicate:
- Trigger → New row added (or tag updated) in your Sheet/Airtable.
- Filter → Score ≥ threshold and Signal present.
- Action → Send lead to HeyReach.
- Assign campaign → Use the Campaign ID from your queue.
- Assign seat → Route to the right rep’s HeyReach seat.
- Tag for reporting → Add tracking tags so you can monitor performance by campaign and lead source.
- Fallback logic → If lead is tagged ENRICH or HOLD, stop the flow and send to a review list instea
Step 4: Add fallback logic to handle uncertain leads
Not every lead will slide neatly into your routing logic. Some fall into the “maybe” zone – medium fit, weak intent signals, or missing data.
Others might look good on paper but reveal a mismatch once outreach starts.
Fallback logic keeps these edge cases from slipping through the cracks and protects outreach quality at scale.
Handle “gray zone” leads with fallback logic (before sending)
Before a lead ever hits a campaign, use GPT logic (via Origami or similar) to answer one simple question: hould I route, skip, or hold?
Example decision rules:
- Medium fit + weak signal → Route to a fallback nurture campaign.
- Strong fit + no signal → Hold and monitor for activity.
- Low fit + no signal → Skip entirely.
By standardizing these “gray zone” decisions, you avoid random routing and keep your outreach clean and focused.
Classify replies and trigger smart actions
Once replies start coming in, automation can help decide the next move. Using GPT (via Origami, for instance), classify responses into categories like:
- Interested → Pause campaigns and send high value leads directly to an AE.
- Objection → Route to an AE for follow-up.
- Not now → Move to a nurture campaign.
- Referral → Enrich with new contact details and restart scoring.
Note: This classification logic typically runs outside of HeyReach using tools like Origami, Zapier, or even manual tagging. Done right, it closes the loop between scoring, routing, and follow-up, ensuring every lead gets the right next step.
Build the full routing system in 30 minutes — start to finish
Let’s make this system real. Here’s your quick-start blueprint – a clear, 6-step walkthrough that connects every tool and logic layer into one executable sales funnel workflow.
Use this routing system to:
- Build your MVP version in under 30 minutes
- Clarify sequencing across tools (Origami → Factors → Sheets/Airtable → Pabbly → HeyReach)
- Hand off to a teammate or use as your ops checklist
- Plug in templates (Sheet/Airtable base, GPT prompt, fallback matrix) for even faster setup
Step 1: Score leads in Origami using GPT logic
- Use enriched fields like job title, seniority, company size, and ICP keywords.
- Prompt GPT to return a score between 0–100.
- Tag this as Score in your Sheet or Airtable base.
- (Optional) Add fallback logic — tag as HOLD if any key fields are missing.
Step 2: Check real-time buyer signals via Factors
- Look for intent signals like job changes, tech installs, or hiring alerts.
- Tag as Intent based on signal type.
- Example: “Job Change” = High urgency, “No Signal” = Low urgency.
Step 3: Send scored + tagged leads to Airtable or Sheets
- Include these key columns:
- Lead Name
- Score (from Origami)
- Intent (from Factors)
- Campaign ID (based on routing logic)
- Sample mapping:
- Score ≥90 + Intent → Campaign = DEMO
- Score 60–89 → Campaign = NURTURE
- Score <60 or incomplete → Campaign = ENRICH or HOLD
- Use a downloadable base with pre-set filters, views, and mock data to speed this up.
Step 4: Set up Pabbly automation to route leads
- Trigger: New row added or updated in Airtable/Sheet.
- Filter: Score ≥ threshold and Intent present.
- Action:
- Send to HeyReach campaign (based on Campaign ID).
- Assign available seat.
- Add tracking tags.
- (Optional) Add a fallback branch: If Campaign ID = HOLD, skip routing.
Step 5: Launch campaign in HeyReach
- Leads now enter the assigned campaign automatically.
- No CSV uploads, no manual sorting – just filtered, tagged, and routed.
Step 6: Monitor replies and act based on classification
- Watch replies and trigger smart actions manually or via automation:
- Pause campaign for leads showing strong interest.
- Route objections to an AE for follow-up.
- Move “Not now” responses into a nurture messaging sequence..
- Use a GPT workflow (via Origami) to classify replies and flag them in Sheets or Airtable for review.
What to build next from here?
Once your MVP is live and running smoothly, you can start layering in upgrades to make the system smarter, faster, and more dynamic.
A few high-impact next steps:
- Re-score leads every 7 days – Keep scores fresh by pulling in new activity, firmographic updates, historical data or engagement data. A lead that was cold last week could be hot today.
- Sync CRM stages to HeyReach campaigns – Automatically move leads between campaigns based on pipeline stage changes in your CRM.
- Trigger re-engagement when warm signals fire – If a previously cold lead visits your pricing page or starts hiring again, route them straight into a fresh sequence.
- Send Slack alerts for hot leads – Push instant notifications to sales when high-priority leads enter the queue or show strong intent.
- Post-call automation – After a rep logs a call in your CRM, automatically update the lead’s status, trigger follow-ups, or kick off the next outreach step.
The goal is to take your rock-solid base system and evolve it into a fully connected growth engine – one where scoring, routing, and re-engagement all run on autopilot.
Turn lead scoring into a growth lever
Smart outbound needs the right mix of signals, filters, predictive scoring and a few well-structured GPT prompts.
With Origami scoring, Factors intent signals, a filterable lead queue, Pabbly routing, and HeyReach campaigns, you’ve got everything you need to move from static data to live, revenue-ready conversations.
Package these elements into a simple toolkit and you’ve got a repeatable, automated lead scoring system anyone on your team can run.
When every step is connected, your outbound machine runs faster, hits harder, and wastes zero time on anything but your best leads.
Schedule a 1:1 strategic call to walk through your setup, fine-tune your scoring logic, or explore how to take this framework even further
Try it for free